
Anyone who wants to learn Hebrew online will have to learn to type in Hebrew at some point. This presents some problems, since it’s clear that Hebrew doesn’t use the same alphabet as English. If you’re viewing this page, you are probably already familiar with the Hebrew alphabet, but just in case you aren’t – the following couple of lines is how the Hebrew alphabet looks.
It’s recommended that you download and install the font SBL Hebrew to view it as it’s intended. Just click on “font download.” If you have it installed correctly, press Ctrl+0 on your keyboard and these two lines (which are all of the letters in the alphabet) will look the same:
א בּ ב גּ ג דּ ד ה ו ז ח ט י כּ כ ך ל מ ם נ ן ס ע פּ פ ף צ ץ ק ר שׁ שׂ תּ ת
There are a couple of ways that people generally use to enter Hebrew into a word processor or webpage. Many in the English-speaking world use a program called “Unicorn,” which was designed for students of Latin, Greek and Hebrew. Its keyboard is generally intuitive for English speakers. More information can be found here.
There are both advantages and disadvantages to using the Unicorn program. The Unicorn keyboard is laid out somewhat phonetically according to the sounds of the Hebrew letters, making it easy to remember, and it is generally more natural for English speakers since it was developed by English speakers. The vowel system is also much easier to learn and use. However, for some people the constant cutting and pasting from Unicorn into your word processor or web application itself might present some frustration. Additionally, there is no portability should you want to use Hebrew on another person’s computer.
The native Hebrew keyboard (part of Windows itself) solves these issues. It is the layout that is natural for Israelis and Hebrew typists all over the world. It’s fast become the standard layout for Hebrew text entry – both on the PC and on Mac (which uses the same layout). There is no need to cut and paste, since the keyboard is native to all Unicode-compliant computer applications. Additionally, you cannot expect to install foreign programs on other people’s computers if you stay somewhere for the weekend or visit another country. The Windows keyboard can be easily installed, used for whatever it might be required and then removed quickly – without downloading any non-native programs onto the computer and without anyone even noticing! The only real problem is that the location of the vowels (nikud) is quite odd and not easy to learn at all (mainly because the majority of Israelis never use vowels, so they are sort-of irrelevant to Israeli typists). For these above reasons, though, more and more students of biblical Hebrew are choosing to install the Windows Hebrew keyboard and learn the Israeli layout.
If you’re using a version of Windows earlier than XP, click here for instructions. If you’re using a Mac, click here.
It’s rather easy to install Hebrew (or any other keyboard, for that matter) on Windows XP or later.
1. Locate your system’s control panel. In Windows 7, this appears when you click on “Start.”

2. Your control panel may look one of two ways. Either it is arranged by category or it is arranged by icons. If by category, locate “Change keyboards or other input methods” as below and then skip to step 4.
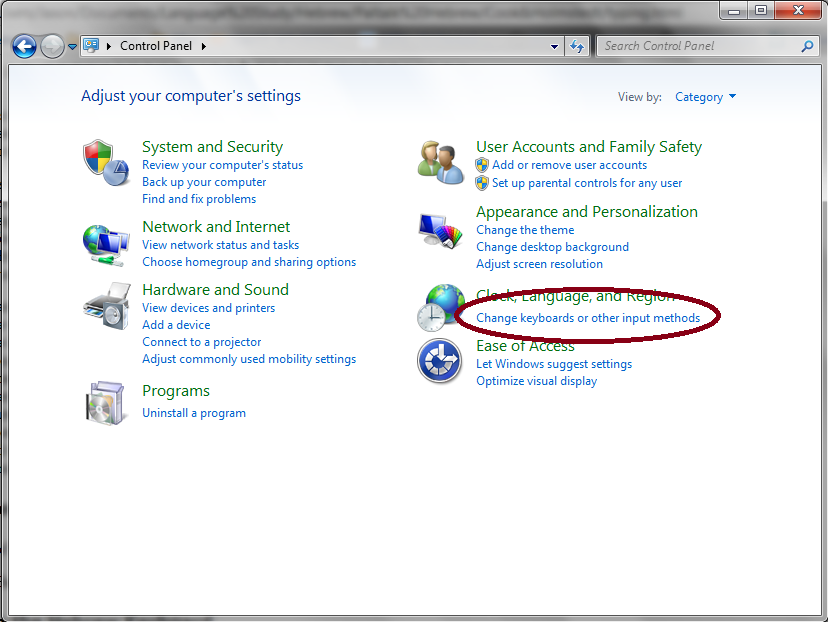
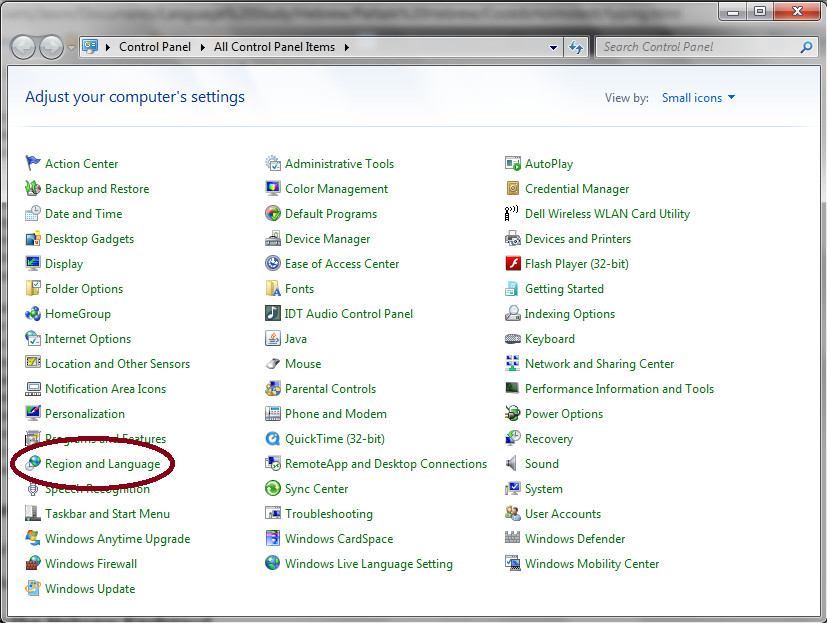
If it is arranged by icon, locate the one labelled “Region and Language.”
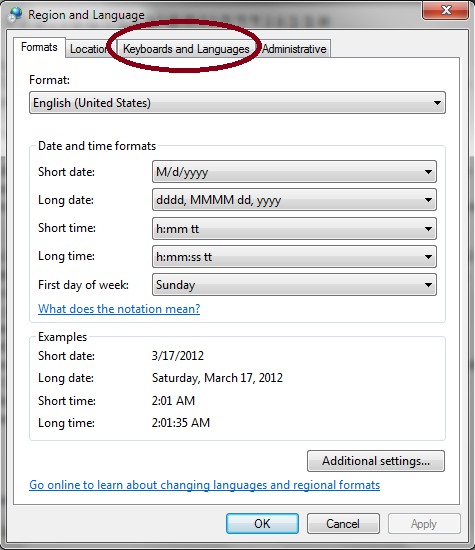
3. If your control panel is arranged by icon and you have clicked on “Region and Language” you will have this dialogue appear. Just select “Keyboards and Languages” at the top and move to step 4.
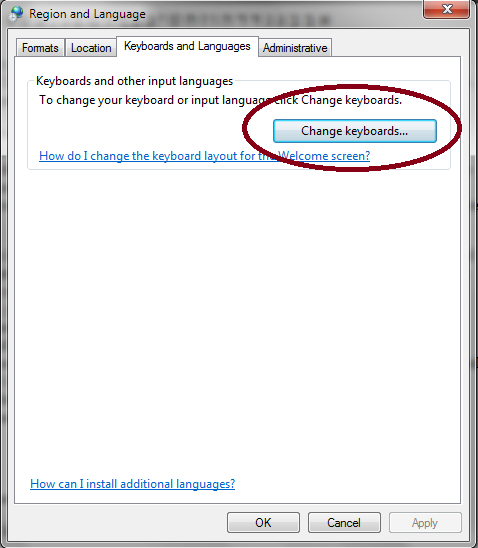
4. On the “Keyboards and Languages” tab, click on “Change keyboards.”
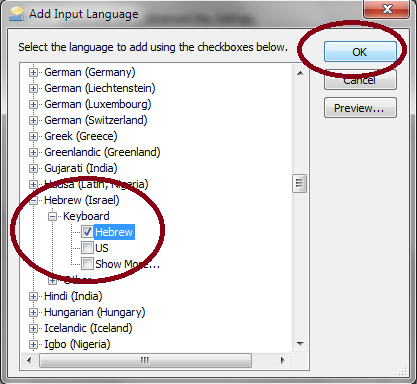
5. Choose “Hebrew” from the list of available keyboards, as in the following image. Then hit “OK.”
6. Complete the process by choosing “OK” on all of the dialogue boxes that are still open.